
Generac 22kW Installation Manual: A Comprehensive Guide
This manual details the installation, operation, and maintenance of your Generac 22kW generator, prioritizing safety and optimal performance during power outages.
It’s a spark-ignited standby generator designed for residential backup, offering a reliable power source when you need it most, ensuring peace of mind.
The Generac 22kW system represents a robust and dependable solution for whole-house backup power, designed to seamlessly activate during utility outages. This air-cooled, spark-ignited generator delivers 22,000 watts of power, capable of running essential household appliances and systems simultaneously, ensuring comfort and safety.
This comprehensive system isn’t merely a generator; it’s a fully integrated power solution, often paired with an automatic transfer switch (ATS) for effortless operation. The ATS automatically detects power loss and initiates the generator, eliminating the need for manual intervention. Generac’s 22kW models are engineered for residential use, offering a balance of power, efficiency, and reliability. Proper installation, as detailed in this manual, is crucial for maximizing performance and longevity. Understanding the system’s components and adhering to safety guidelines are paramount for a successful and secure installation.
Safety Precautions & Warnings
Prioritizing safety is paramount during the installation and operation of your Generac 22kW system. This generator operates with high voltage and produces exhaust fumes containing carbon monoxide – a deadly, odorless gas. Never operate the generator indoors or in partially enclosed spaces. Ensure adequate ventilation and install carbon monoxide detectors.
Electrical work must be performed by qualified personnel, adhering to all local and national electrical codes. Disconnect power before making any electrical connections. Fuel supply installation (natural gas or propane) requires strict adherence to safety regulations to prevent leaks and fire hazards. Always consult with licensed professionals for fuel line connections. Warning: This product is not for critical life support applications. Failure to follow these precautions could result in severe injury or death.
Unboxing and Component Verification

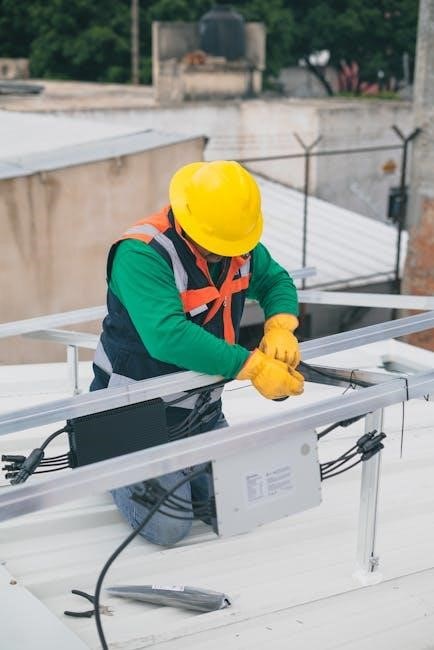
Carefully unpack the Generac 22kW generator and all accompanying components. Inspect the packaging for any signs of damage incurred during shipping. Compare the contents against the Generator Contents Checklist (Section 3.1) to ensure all parts are present. This includes the generator itself, a transfer switch (if purchased as a package), installation hardware, and documentation.
Identifying Key Components (Section 3.2) is crucial. Familiarize yourself with the location of the electrical connections, fuel inlet, exhaust outlet, oil fill cap, and oil drain plug. Verify that all components are in good condition and free from defects. Report any missing or damaged parts to your dealer immediately before proceeding with the installation. Proper verification prevents delays and ensures a smooth setup.

3.1 Generator Contents Checklist
Verify the following items are included within the Generac 22kW generator packaging: (1) Generac 22kW Generator unit, (2) Installation Hardware Kit (bolts, washers, nuts), (3) Owner’s Manual and Installation Guide, (4) Transfer Switch (if included in the package), (5) Fuel Line Connection Kit (for natural gas or propane), (6) Exhaust Adapter and Gaskets, (7) Oil Drain Hose and Cap, (8) Oil Filter.
Additionally, confirm the presence of: (9) Wiring Diagrams, (10) Regulatory Compliance Information, and (11) Warranty Registration Card. Carefully cross-reference this list with the actual contents of the shipment. Any discrepancies or missing components should be reported to Generac or your authorized dealer before beginning the installation process. This ensures a complete and trouble-free setup.
3.2 Identifying Key Components
Familiarize yourself with the generator’s key components: (1) Engine – the power source, (2) Alternator – generates electricity, (3) Control Panel – displays status and controls operation, (4) Fuel Inlet – connection for natural gas or propane, (5) Exhaust Outlet – connects to the exhaust system, (6) Oil Dipstick & Fill Cap – for oil level checks and refills, (7) Oil Filter – maintains oil cleanliness, (8) Battery – provides starting power.
Also, locate: (9) Transfer Switch connection points, (10) Grounding terminal, and (11) Electrical connections. Understanding the function and location of each component is crucial for safe and effective installation and maintenance. Refer to the diagrams in the manual for visual identification. Proper component recognition will streamline the installation process and aid in future troubleshooting.
Site Preparation for Installation
Proper site preparation is vital for safe and efficient generator operation. Choose a level, stable location outdoors, away from combustible materials and protected from the elements. Ensure adequate clearance around the generator for maintenance and ventilation – consult the manual for specific dimensions.
Construct a suitable concrete pad that meets the specified dimensions to provide a solid foundation. The pad must be capable of supporting the generator’s weight, even during operation. Verify local codes and regulations regarding generator placement and noise levels. Consider accessibility for fuel supply connections and exhaust routing. A well-prepared site minimizes vibration and ensures long-term reliability.
4.1 Location Requirements (Clearance & Ventilation)
Maintaining adequate clearance around the Generac 22kW generator is crucial for safe operation and accessibility. Allow at least 36 inches of unobstructed space on all sides for maintenance access and proper airflow. Ensure a minimum of 60 inches of clearance in front of the unit for servicing the control panel and other components.
Sufficient ventilation is paramount to prevent overheating and ensure efficient combustion. Avoid enclosing the generator in a confined space. The installation location must allow for natural air circulation, free from obstructions like walls or dense vegetation. Proper ventilation safeguards against carbon monoxide buildup, protecting both property and occupants.
4.2 Pad Construction & Dimensions
A properly constructed concrete pad is essential for stable and level generator placement. The pad should be a minimum of 6 inches thick, reinforced with rebar for added strength and durability. Recommended dimensions are 8 feet by 10 feet, providing ample space for the generator and surrounding access. Ensure the pad is perfectly level to prevent operational issues and maintain generator integrity.

The pad’s surface must be smooth and free of cracks or imperfections. Consider extending the pad slightly beyond the generator’s footprint to facilitate maintenance and prevent ground contact. Proper pad construction minimizes vibration and noise transmission, contributing to a quieter and more stable operating environment.
Electrical Connections – Main Power Supply
Connecting the Generac 22kW to your main power supply requires a qualified electrician and adherence to local electrical codes. A transfer switch is crucial, safely disconnecting your home from the utility grid before generator power is engaged, preventing backfeeding and ensuring lineman safety. Selecting the correct transfer switch – manual or automatic – depends on your needs and budget.
Installation involves connecting the generator to the transfer switch and then to your electrical panel. Proper wiring gauge and circuit breaker sizing are vital for safe and efficient operation. Always double-check all connections before energizing the system. Incorrect electrical work can lead to fire hazards or damage to your generator and home.
5.1 Transfer Switch Selection & Installation
Choosing the right transfer switch is paramount for a safe and functional Generac 22kW installation. Manual transfer switches require you to physically switch between utility and generator power, offering a cost-effective solution. Automatic transfer switches (ATS) detect outages and seamlessly switch power sources, providing uninterrupted power without manual intervention.
Installation demands strict adherence to the manufacturer’s instructions and local electrical codes. The switch must be appropriately sized for the generator’s output and your home’s electrical load. A qualified electrician should handle all wiring, ensuring proper grounding and secure connections. Incorrect installation can compromise safety and void the generator’s warranty.
5.2 Connecting to the Electrical Panel

Connecting the Generac 22kW to your electrical panel requires meticulous attention to detail and must be performed by a licensed electrician. This process involves running conduit and wiring from the transfer switch to a dedicated circuit breaker within the main panel. Ensure the breaker is appropriately sized to handle the generator’s output, preventing overloads and potential damage.
Proper grounding is critical for safety. The generator and transfer switch must be effectively grounded according to local electrical codes. Double-check all connections for tightness and correct polarity before energizing the system. Incorrect wiring can lead to electrical hazards and equipment failure, so professional expertise is non-negotiable.
Fuel Supply Installation (Natural Gas/Propane)
The Generac 22kW generator can operate on either natural gas or propane, requiring specific installation procedures for each fuel type. For natural gas, a qualified professional must install a dedicated gas line adhering to local codes, ensuring proper sizing and leak testing. A shut-off valve should be readily accessible for emergencies.
Propane installations necessitate a properly sized propane tank, positioned according to safety regulations. A qualified technician must install the regulator, ensuring correct pressure settings and leak-free connections. Both fuel systems demand careful attention to detail, prioritizing safety and compliance with all applicable standards. Regular inspections are crucial for maintaining a reliable fuel supply.
6.1 Natural Gas Line Requirements & Connection
Connecting to a natural gas supply requires a dedicated line sized appropriately for the 22kW generator’s BTU consumption. Local codes dictate pipe material, diameter, and installation practices; a licensed gas fitter must perform this work. The gas line should include a shut-off valve near the generator for easy access during maintenance or emergencies.
Before connection, thoroughly purge the gas line to remove any debris or air. Use pipe dope specifically designed for natural gas on all threaded connections to prevent leaks. After connecting, perform a leak test using a soap and water solution – bubbles indicate a leak. Ensure proper grounding of the gas piping system to prevent electrical hazards.
6.2 Propane Tank Installation & Regulator Setup
Propane tank installation must adhere to local and national regulations, including distance requirements from structures and property lines. A qualified propane technician should handle tank placement and connection. The tank must be a dedicated supply for the generator, equipped with a properly sized regulator to deliver the correct fuel pressure.
Ensure the regulator is specifically designed for continuous use with a 22kW generator. Connect the propane line using approved flexible hoses and fittings, checking for leaks with a soap and water solution after installation. Proper ventilation around the tank is crucial; never place it in an enclosed space. Regularly inspect the tank and regulator for damage or corrosion.
Exhaust System Installation
Proper exhaust system installation is critical for safe generator operation, preventing carbon monoxide poisoning. Route the exhaust pipe away from windows, doors, and occupied areas, ensuring a downward slope to prevent moisture buildup. Use approved exhaust components, such as galvanized steel or stainless steel piping, designed for high-temperature exhaust gases.
Avoid sharp bends in the exhaust pipe, as they can restrict airflow and reduce generator efficiency. Securely support the exhaust pipe with hangers to prevent sagging or vibration. Install a muffler to reduce noise levels, ensuring it’s compatible with the generator’s exhaust output. Regularly inspect the exhaust system for leaks or damage, addressing any issues promptly.
7.1 Exhaust Pipe Routing & Materials
Careful exhaust pipe routing is paramount for safe operation, preventing dangerous carbon monoxide buildup. Direct the exhaust downwards and away from any building openings, including windows and doors, maintaining adequate clearance as specified in local codes. Utilize galvanized steel or stainless steel piping, specifically designed to withstand high exhaust temperatures and corrosive gases.
Avoid using aluminum or plastic materials, as they can melt or degrade. The exhaust path should incorporate a gradual slope downwards to facilitate condensate drainage, preventing corrosion. Minimize bends to reduce backpressure, optimizing generator performance. Securely support the pipe with hangers to prevent stress and vibration, ensuring a long-lasting installation.
7.2 Muffler Installation & Considerations
Proper muffler installation is crucial for noise reduction and maintaining optimal generator performance. Securely attach the muffler to the exhaust pipe using clamps and hardware designed for high-temperature applications, ensuring a leak-proof seal. Position the muffler to further direct exhaust gases away from occupied areas and sensitive vegetation.
Consider local noise ordinances when selecting a muffler; some areas may have specific decibel level requirements; Regularly inspect the muffler for corrosion or damage, replacing it if necessary to prevent exhaust leaks and maintain noise control. Ensure adequate clearance around the muffler for heat dissipation and accessibility for maintenance.
Oil and Fluid Checks & Initial Fill

Before initial startup, verifying correct fluid levels is paramount for engine longevity and performance. Locate the oil dipstick and carefully check the oil level, adding the manufacturer-recommended oil type and quantity if needed – typically a synthetic 10W-30. Ensure the oil fill cap is securely tightened after adding oil.
Also, inspect the coolant level in the radiator (if applicable) and add coolant to the appropriate level. Check for any leaks around the oil drain hose and ensure the cap is installed correctly. Proper fluid levels guarantee smooth operation and prevent potential damage during the initial testing phase, safeguarding your investment.
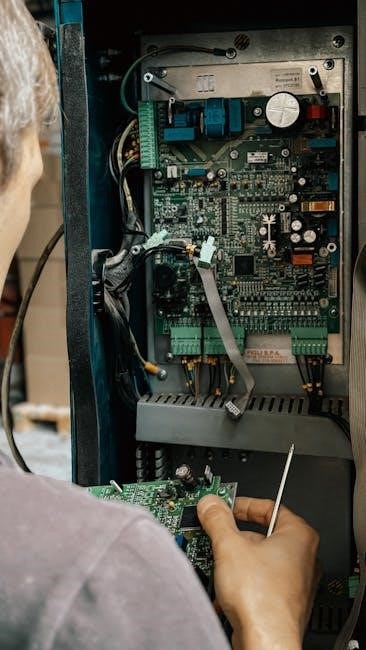
Startup and Initial Testing Procedures
Following installation, a thorough testing sequence is crucial to confirm proper functionality. Begin by ensuring all connections – fuel, electrical, and exhaust – are secure and leak-free. Turn on the fuel supply and allow the system to prime. Initiate the generator using the control panel, observing for any unusual noises or vibrations.
Once running, monitor voltage and frequency output with a multimeter to verify they fall within acceptable ranges. Simulate a power outage by switching to generator power via the transfer switch. Run the generator under a moderate load for at least 30 minutes, continuously monitoring performance. Document all readings and observations for future reference.
Routine Maintenance Schedule
Consistent maintenance is vital for ensuring the longevity and reliability of your Generac 22kW generator. A monthly inspection should include checking fluid levels – oil, coolant (if applicable) – and visually inspecting for leaks or damage. Every 50 hours of operation, or at least annually, change the oil and oil filter, utilizing the specified type.

Annually, inspect the air filter, replacing it if dirty, and check the spark plugs, cleaning or replacing as needed. A qualified technician should perform a comprehensive inspection every two years, including testing the voltage and frequency regulation. Keep detailed records of all maintenance performed to maintain warranty validity and optimize performance.
Troubleshooting Common Issues
If your Generac 22kW generator fails to start, first check the fuel supply – ensure the gas line is open or the propane tank isn’t empty. Verify the oil level is correct, as a low oil sensor will prevent startup. If it cranks but doesn’t fire, inspect the spark plug for fouling or damage.
For generators that start but run poorly, check the air filter for obstructions and ensure proper ventilation. If the generator shuts down unexpectedly, examine the error codes displayed (if equipped) and consult the manual. Always disconnect the power before attempting any repairs; if issues persist, contact an authorized Generac service dealer.
Generac 22kW Generator Specifications
The Generac 22kW generator operates at 60Hz, delivering 22,000 watts of surge power and 20,000 watts of continuous power. It’s designed for use with natural gas or propane, requiring specific fuel line sizes and regulator settings. Typical fuel consumption varies based on load and fuel type.
The engine displacement is approximately 995cc, and it features an automatic voltage regulation system to maintain stable power output. Sound levels typically range around 76 dBA. Dimensions vary slightly by model, but generally fall within a compact footprint for residential installations. Refer to the full manual for detailed electrical and mechanical specifications, including weight and oil capacity.
Warranty Information
Generac Power Systems, Inc. provides a limited warranty on the 22kW generator, covering parts and labor for a specified period. The standard warranty typically extends for five years on all parts, with an additional extended warranty option available for purchase. Warranty coverage is contingent upon proper installation by a qualified technician and adherence to recommended maintenance schedules.
This warranty does not cover damage resulting from misuse, neglect, improper fuel, or acts of God. Registration of your generator is crucial to validate warranty coverage; promptly register your product online or via mail. For complete warranty details, including exclusions and claim procedures, consult the separate warranty document included with your generator or visit the Generac website.
Contacting Generac Support & Authorized Dealers
For technical support, troubleshooting assistance, or warranty claims, contact Generac Power Systems directly through their customer service channels. You can reach them via phone at the number listed in your installation manual or on the Generac website. Online support is also available, including FAQs, troubleshooting guides, and downloadable resources.
To locate an Independent Authorized Service Dealer (IASD) near you for professional installation, maintenance, or repairs, utilize the dealer locator tool on the Generac website. IASDs are trained and certified to service Generac products, ensuring quality workmanship and adherence to safety standards. Always choose an authorized dealer to maintain your warranty validity and generator performance.
Be First to Comment